

黑客网络Hacknet怎么制作MOD?很多玩家还不是很了解MOD怎么制作,接下来小编就为大家带来《黑客网络》mod开发教程翻译大全,mod制作教程,感兴趣的一起来看看吧。
黑客网络mod开发教程翻译大全:
Introduction介绍
So. You want to create your own mod for Hacknet.
First, you'll need some knowlege of Hackmore.
当你想要创建自己的mod 。
首先,你需要一些Hackmore的知识。
Hackmore is a .dll file placed next to Hacknet.exe, that loads every mod in the .dll form in the folder /Mods, next to Hacknet.exe.
Hackmore是Hacknet.exe旁的一个.dll文件,这个文件加载所有以.dll文件存储在/Mod目录下的Mod.
Here's what you'll need.
A C# development environment
Basic knowledge of C#
The latest release of Hackmore.dll
Of course, the game Hacknet and a patched Hacknet.exe
以下是你所需要的。
一个c#开发环境
c#的基本知识
Hackmore.dll的最新版本
当然,还有hacknet和打了补丁的Hacknet.exe(译者注:即原作者提供的“Kernel Upgrade”中修改过的Hacknet.exe文件。)
The latest release of Hackmore.dll and the patched Hacknet.exe can be found in my mods (Kernel Upgrade).
最新版本的Hackmore.dll和hacknet.exe补丁可以在我开发的Mod,Kernel Upgrade里找到
For this tutorial, I'll use Visual Studio Community on Windows 7, but it should be working on every platform and on every C# IDE.
在这次教程中,我将在Windows 7上使用Visual Studio社区版开发平台,但它应该工作在每一个平台的每一个C# IDE上。
Setting files up, preparing the project 设置文件,准备项目
First, I'm going to open Visual Studio and set up a new project.
I'm using the french version, since I'm french, but you'll be able to find out what I'm doing pretty easily.
First, create a new class library project inside the folder you want and I'll call it "GuideMod".
首先,我要打开Visual Studio,然后建立一个新项目。
在这里我使用的是法语的版本,因为我是一个法国人(译者注:原作者为法国人。),但你可以很容易发现我在做什么。
首先,在项目文件夹创建一个新的类库,我命名它为“GuideMod”。
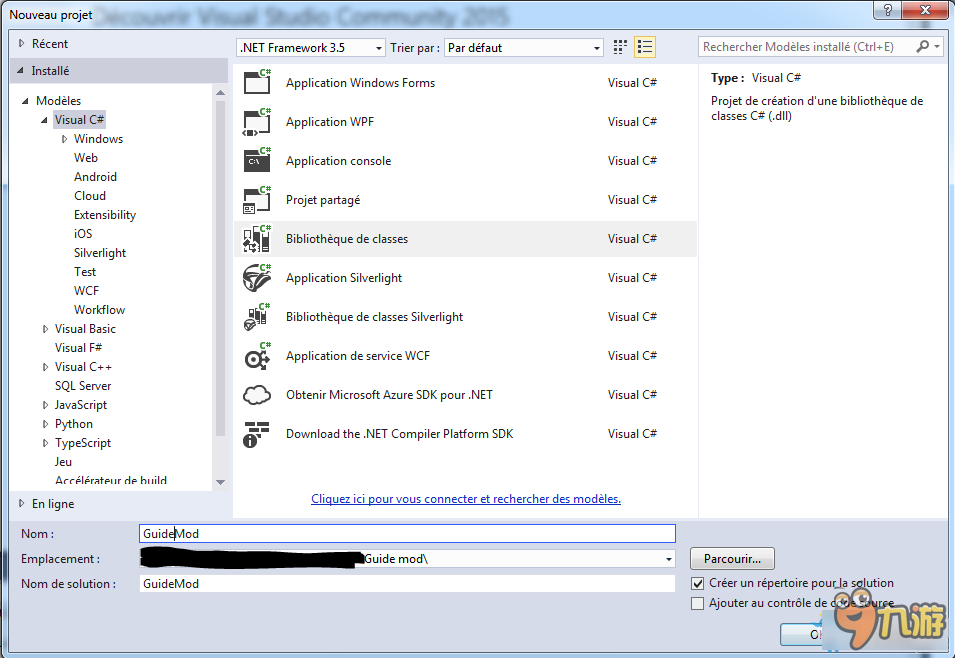
Press OK and your project is created.
You should see this screen :
点击ok并创建你的项目。
您应该会看到一下画面:
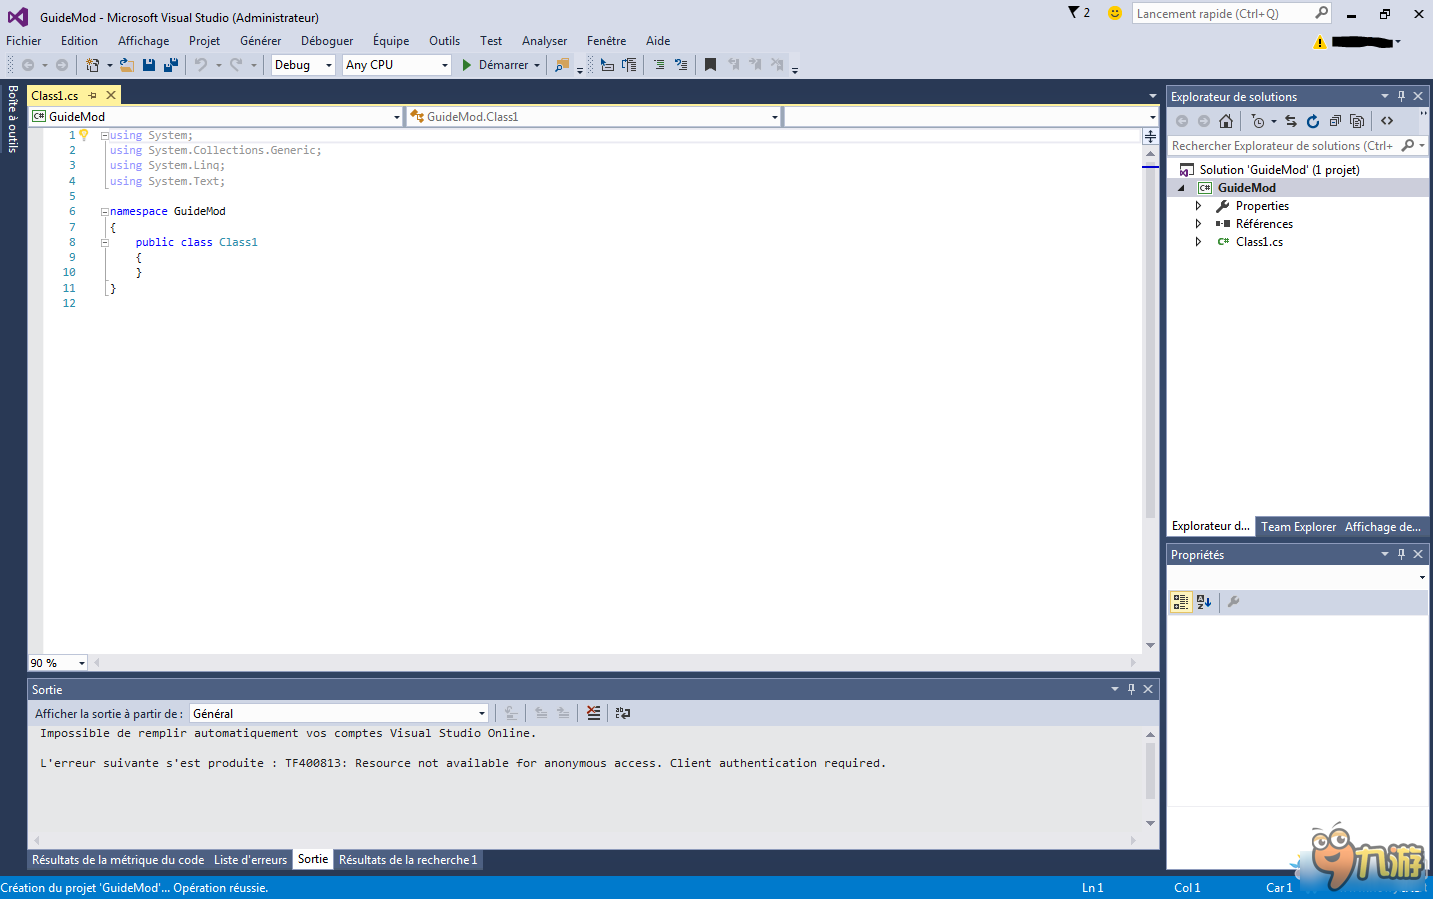
I'm going to rename Class1.cs to GuideMod.cs, and rename the public class Class1 to public class GuideMod
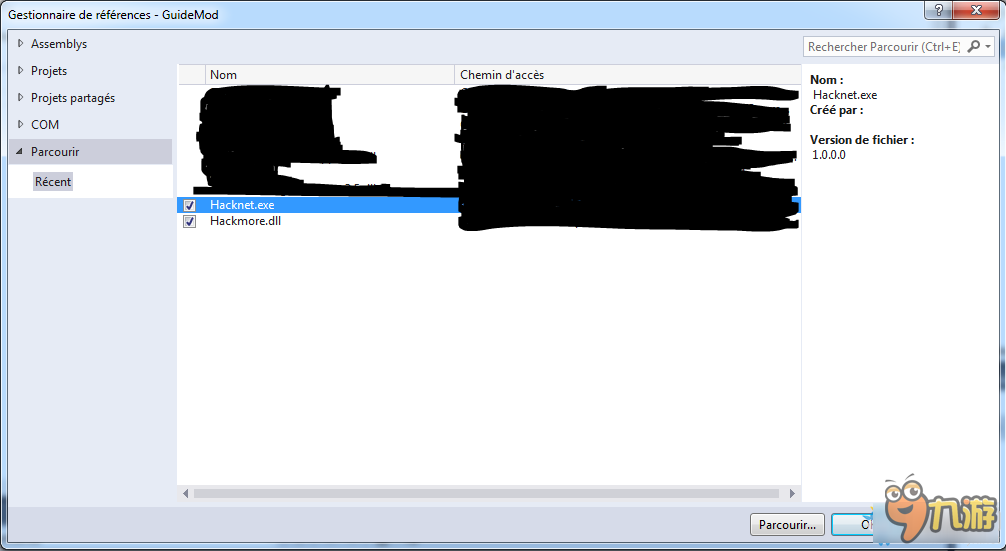
Now, you have to add as reference Hacknet.exe and Hackmore.dll like this :
我将要去重命名Class1为GuideMod .cs,并重命名公共类Class1 为 公共类GuideMod
现在,你必须添加Hacknet.exe和hackmore.dll作为参考,就像这样:
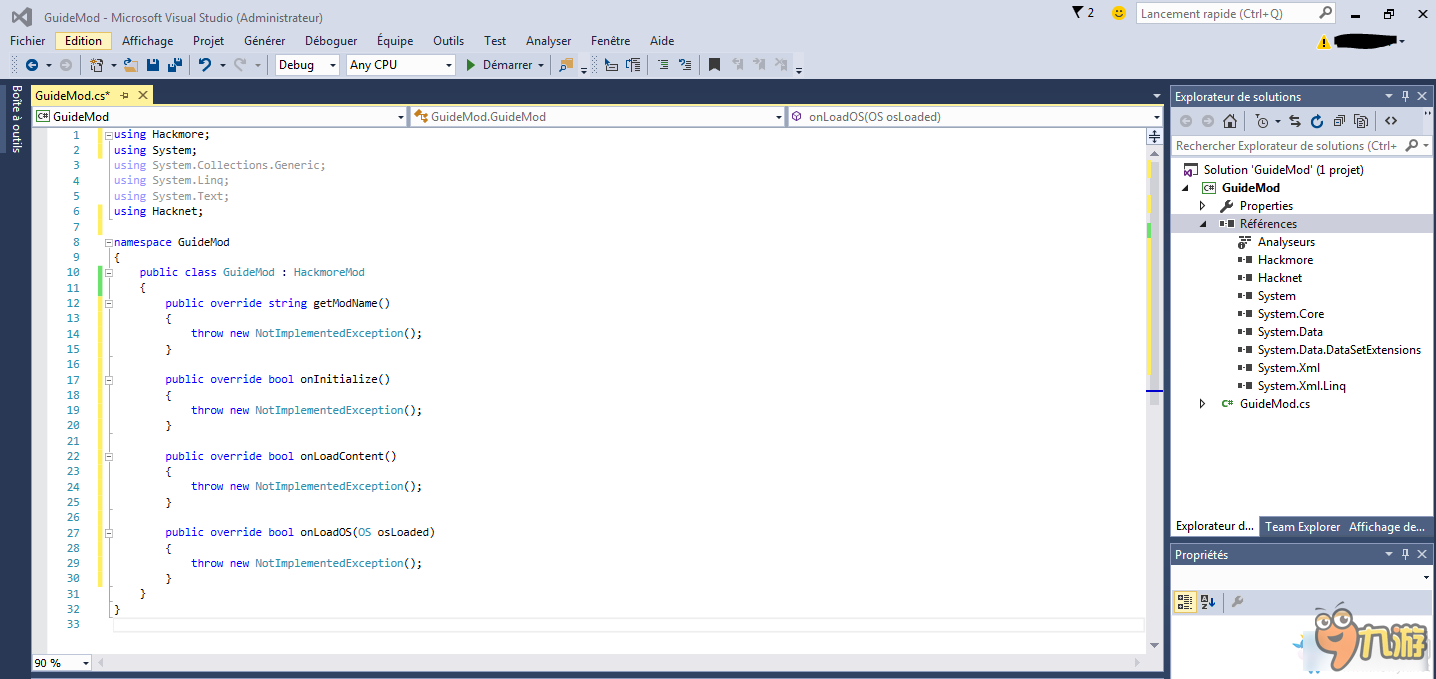
Once that's done, make GuideMod extends HackmoreMod and implement all functions, like this :
只要你完成了这一步,GuideMod ,作为HackmoreMod的扩展就可以实现Hackmore所有功能,像这样:
Now you're good to go ! We're going to make our mod.
现在!我们可以开始制作我们的mod了。
Making the basics 基础知识
Here are the four basic functions you'll have to write :
string getModName() : This function returns the ID of the mod. It is used for identifying your mod in the Mod Manager.
bool onInitialize() : This function is called when the game starts.
bool onLoadContent() : This function is called when the game loads the content.
bool onLoadOS() : This function is called when the game has finished loading a save, and gives you an instance of the player, allowing for all types of modifications.
这是你将要实现的四个基本函数:
string getModName() : 此函数返回mod的ID。 它用于在Mod Manager中识别您的mod。
bool onInitialize() : 游戏开始时,会调用此函数
bool onLoadContent() : 当游戏加载这个mod内容的时候,会被调用此函数
bool onLoadOS() : 这个函数在游戏完成加载并保存时调用,并为您提供玩家的权利,允 许所有类型的修改。
So, first, let's code the first function : getModName().
public override string getModName()
{
return "GuideMod";
}
所以,首先,让我们编写第一个函数:getModName()。
public override string getModName()
{
return "GuideMod";
}
With that, the ID of our mod will be GuideMod.
有了这一个函数,我们的mod的名称将会是GuideMod。
Our first command - Introduction 我们的第一个命令-介绍
We'll start doing our first commands.
First, make sure you've replaced "throw new NotImplementedException();" by "return true;"
我们将要开始做我们的第一个命令.
首先,确保你已经用 "return true;"更换 "throw new NotImplementedException();"
We're going to start working inside onLoadContent().
Let's type "ModManager." to open autocompletion menu and see what we can write.
我们将要开始在”onLoadContent().”里工作.
让我们输入“ModManager”。 打开自动完成菜单,看看自动补全会为我们写什么。
The functions Hackmore lets us use are :
ModManager.addCommand()
ModManager.hasCommand()
ModManager.addCustomComputerXml()
ModManager.addExeProgram()
ModManager.getModType()
ModManager.isModLoaded()
Hackmore让我们使用的方程有:
ModManager.addCommand()
ModManager.hasCommand()
ModManager.addCustomComputerXml()
ModManager.addExeProgram()
ModManager.getModType()
ModManager.isModLoaded()
To create a command, we'll need to use ModManager.addCommand().
When we type it, we see that it has three declarations.
要创建命令,我们需要使用命令 ModManager.addCommand().
当我们输入它之后,我们将会看到它有三个声明。

The first argument is always the name of the command.
The second argument is always the function of the command, we'll get to that later on.
第一个参数总会是是命令的名称。
第二个参数总会是命令的函数,在后面我们会提到。
If you use the second declaration, the last argument is a boolean "true"/"false" that indicates if the command should be in autocompletion. The first declaration doesn't do autocompletion.
如果使用第二个声明,最后一个参数是一个boolean“true”/“false”,该参数若被实现则表示命令是否应该自动完成状态。(true表示自动完成,false则否) .而第一个声明将不会做自动完成。
(译者注:我们猜测原作者意思如下:
众所周知,Hacknet原有的指令可用Tab补全,而这一命令则会控制新加的命令是否也可用Tab。这一“开关”也许是为了防止某些冲突。)
The third declaration has four arguments. The third one is the description of the command, that appears in the command help, and the last one is the same as above, autocompletion.
第三个声明有四个参数。第三个参数是命令的描述,在命令帮助中将会出现,最后一个参数与前面的相同,都是自动完成开关。
Our first command - Implementation 我们的第一个命令-实现
Now, we're going to code our command.
Let's create a new static function like so :
现在,我们将要编写我们的命令。
让我们用以下代码创建一个新的静态函数:
public static bool testCommand(OS os, string[] args)
{
return true;
}
Make sure to use Hacknet's OS class, and not the system OS class.
Now, let's make so that our command prints out "Hello World" on the terminal.
If you see the autocompletion for os., you'll see that you can use os.write(string text);
So let's write :
确保使用的是Hacknet的OS类,而不是电脑操作系统的OS类。
现在,让我们用命令在终端上打印出“Hello World”。
如果你想用os类自动完成这个命令,你可以使用os.write(string text);
所以,让我们写一段以下代码:
public static bool testCommand(OS os, string[] args)
{
os.write("Hello World");
return true;
}
Our first command is done. But it won't work in game ! We need to register it.
Let's change : "public override bool onLoadContent()"
我们的第一个命令完成了。但它不会在游戏中打印出来.我们需要注册它。
让我们改写一下代码:"public override bool onLoadContent()"
public override bool onLoadContent()
{
ModManager.addCommand("test", testCommand);
return true;
}
Launching the mod 启动Mod
You have to compile the mod into a .dll if you want it to be launched by Hackmore !
Click on "Generate Solution" (Ctrl-Maj-B or Generate > Generate Solution) to compile your mod and all dependencies.
PS : Debug is on by default, it's not an issue.
Then go to your project's folder, bin folder, and you'll see two folders: Debug and Release.
Go inside Debug (if you compiled in Debug mode) or Release (if you compiled in Release mode), and copy your GuideMod.dll to the Mods folder of your Hacknet installation.
You might have to unblock your .dll by going into properties and uncheck "Block".
If Hackmore is well installed, you should be able to go inside the terminal, and type "test" inside the terminal !
Thanks for following this tutorial !
为了启动Mod,你要把它编成.dll文件。
点击“生成解决方案”(按ctrl-maj-b或生成>生成解决方案)来编译你的插件和所有的依赖文件。
PS::调试模式是默认启用的,这不是一个错误。
然后转到你的项目文件夹下的bin文件夹,你会看到两个文件夹:Debug文件夹和 Release文件夹。
进入Debug文件夹(如果你是在调试模式下编译的)或Release文件夹(如果你是在发布模式下编译的),并复制你的guidemod.dll到你hacknet安装文件夹下的Mods文件夹里。
你也许需要允许你的dll文件运行,通过进入属性页面并取消勾选“Block”属性。
(译者注:我不是很确定,但这可能是针对某些安全软件的。)
如果Hackmore是安装好的,你应该能够进入终端,然后在终端输入“测试”!
感谢您阅读这个教程!
看了上文九游小编带来的黑客网络怎么制作MOD,你是否了解了相关内容信息,知道了呢!更多最新最好玩的手机游戏就来九游下载吧!
如转载涉及版权等问题,请作者与我司联系,我司将在第一时间删除或支付稿酬。


 粤公网安备44010602000283号

全部评论